

PET acoustic panels, also known as polyester fiber acoustic panels, are widely used in offices, conference rooms, schools, hotels, restaurants, and residential interiors. Their lightweight construction and easy installation make them a practical solution for both acoustic treatment and interior decoration.
However, renovation projects, office relocations, furniture changes, and damaged panels may eventually require you to remove or replace PET acoustic panels.
This raises an important question:
Can PET acoustic panels be removed without damaging the panels or the wall?
In many cases, yes. However, the removal method depends heavily on how the panels were originally installed. Panels fixed with screws are generally easier to remove and reuse, while adhesive-mounted panels require more care.
In this guide, Leedings Acoustic, a professional acoustic panels supplier in China, explains how to safely remove and replace polyester fiber acoustic panels with minimal damage.
Can PET Acoustic Panels Be Removed?
Yes, but the difficulty depends on the installation system.
Common installation methods include:
- Screws or mechanical fasteners
- Construction adhesive
- Adhesive combined with screws
- Battens or mounting frames
- Specialized mounting clips
Before starting, identify which method was used.
This is particularly important for commercial projects where dozens or hundreds of PET acoustic panels may need to be removed.
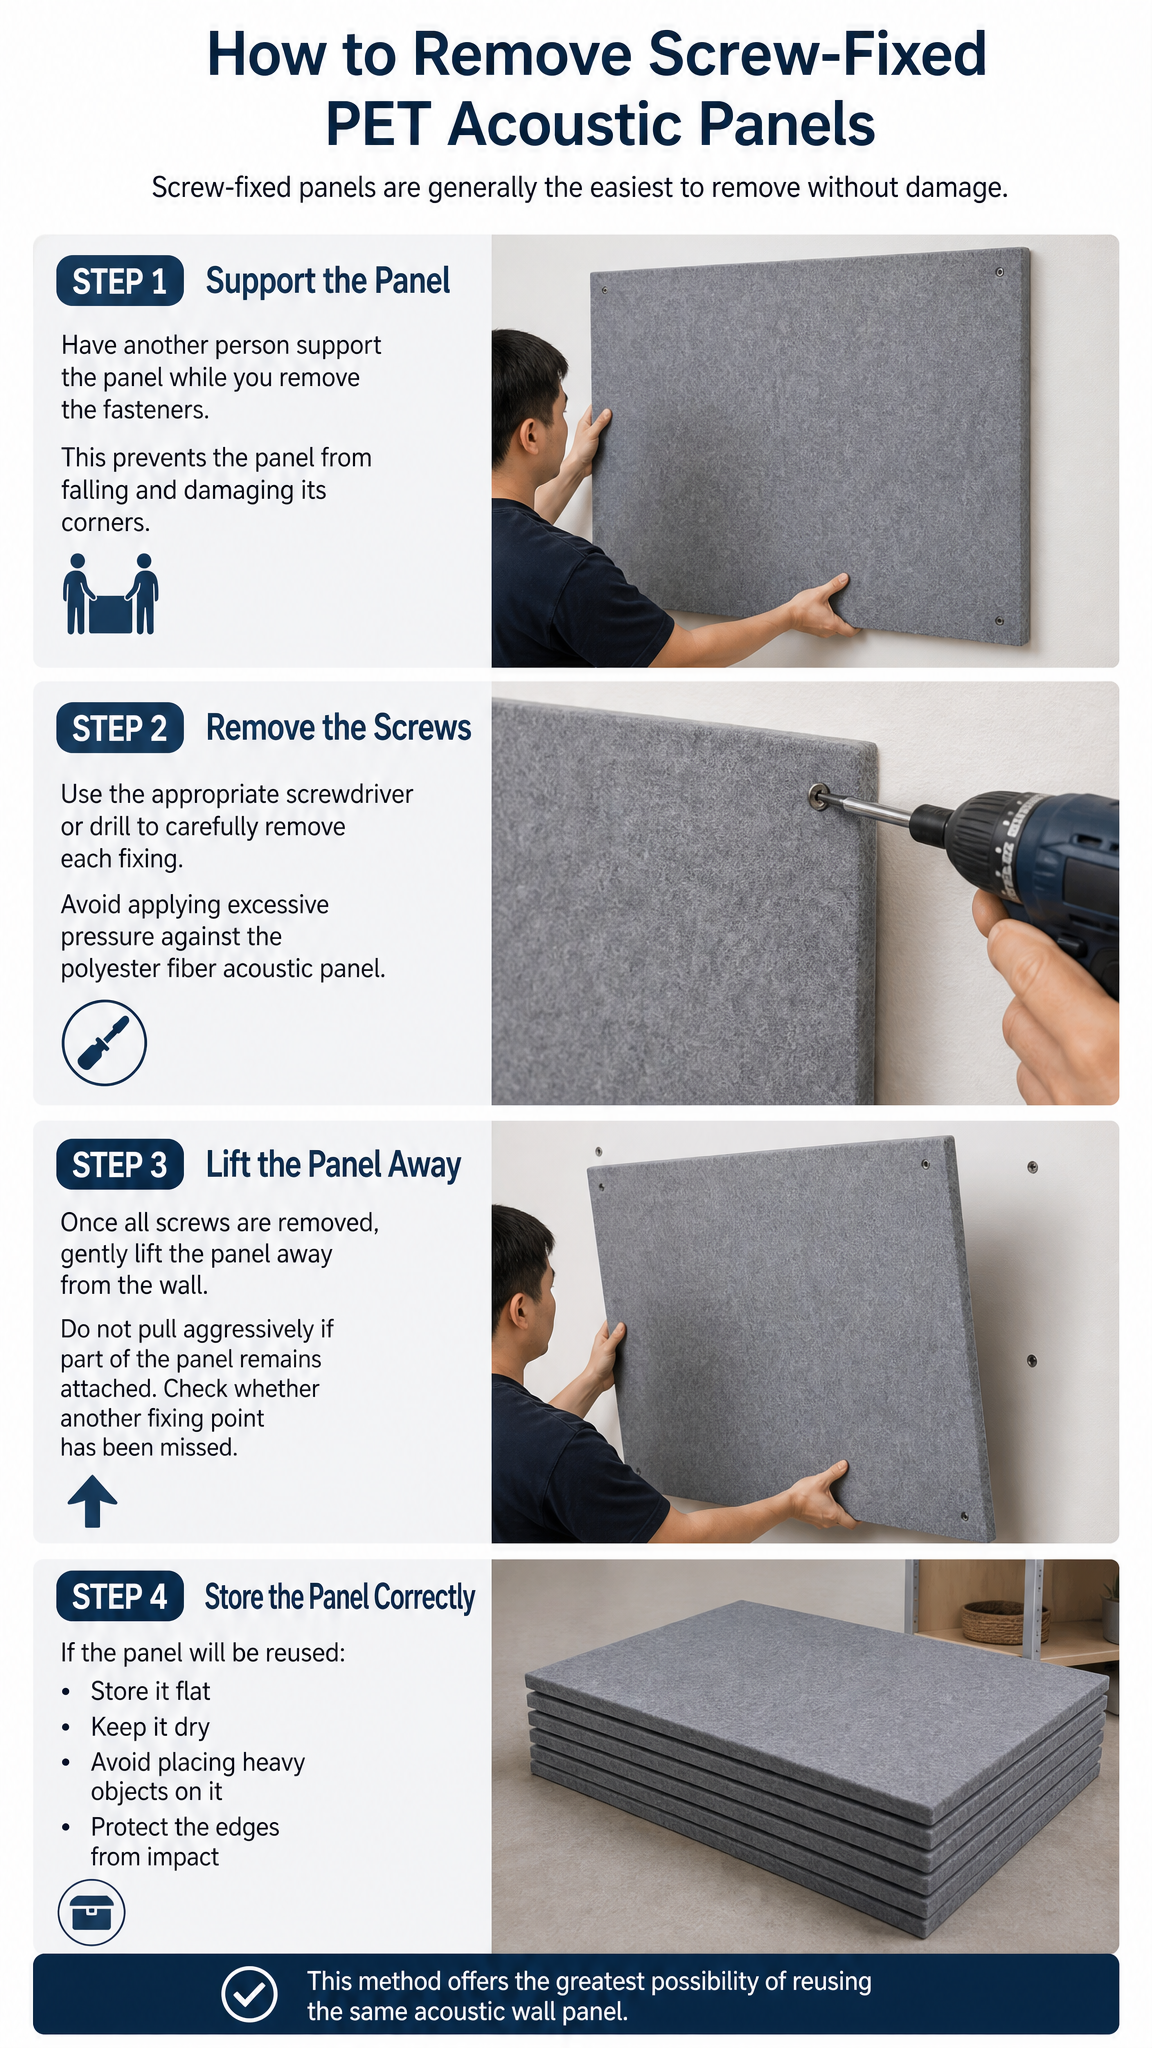
How to Remove Screw-Fixed PET Acoustic Panels
Screw-fixed panels are generally the easiest to remove without damage.
Step 1: Support the Panel
Have another person support the panel while you remove the fasteners. This prevents the panel from falling and damaging its corners.
Step 2: Remove the Screws
Use the appropriate screwdriver or drill to carefully remove each fixing.
Avoid applying excessive pressure against the polyester fiber acoustic panel.
Step 3: Lift the Panel Away
Once all screws are removed, gently lift the panel away from the wall.
Do not pull aggressively if part of the panel remains attached. Check whether another fixing point has been missed.
Step 4: Store the Panel Correctly
If the panel will be reused:
- Store it flat
- Keep it dry
- Avoid placing heavy objects on it
- Protect the edges from impact
This method offers the greatest possibility of reusing the same acoustic wall panel.
How to Remove Adhesive-Mounted PET Acoustic Panels
Adhesive installation presents a greater challenge.
Strong construction adhesive may bond the panel tightly to drywall, plaster, concrete, or other substrates.
Attempting to simply pull the panel away can cause:
- Broken panel edges
- Surface deformation
- Adhesive residue
- Damage to drywall or paint
Therefore, adhesive-mounted panels should be removed gradually.
Step 1: Start at a Corner
Choose a corner or edge that is easiest to access.
Use a plastic pry tool rather than a sharp metal tool whenever possible. This reduces the risk of cutting or damaging the PET surface.
Step 2: Separate the Panel Gradually
Gently work along the edge rather than pulling the entire panel away at once.
The objective is to gradually release the adhesive bond.
Avoid bending the panel sharply because excessive force can permanently deform the polyester fibers.
Step 3: Use a Cutting Tool Where Necessary
For particularly strong adhesive bonds, a thin cutting tool can be carefully inserted between the panel and wall.
Work slowly along the adhesive line.
The goal is not simply to remove the panel quickly, but to separate the adhesive bond while keeping the panel intact.
Can an Adhesive-Mounted PET Panel Be Reused?
Sometimes, but there is no guarantee.
The possibility of reuse depends on:
- Type of adhesive
- Amount of adhesive used
- Wall surface
- Panel thickness
- Removal technique
- Condition of the panel after removal
For this reason, mechanical fixing is generally preferable when future removal or reconfiguration is expected.
This is particularly relevant for offices where workstation layouts may change over time.
How to Remove Adhesive Residue
After removing the panel, adhesive may remain on either the wall or the back of the panel.
On the Wall
The removal method depends on the wall surface.
For example:
- Drywall may require surface repair.
- Painted walls may require touch-up painting.
- Concrete may tolerate more aggressive mechanical removal.
Avoid using chemicals without checking whether they are compatible with the substrate.
On the PET Panel
Be particularly careful when removing adhesive from the back of the panel.
Aggressive solvents or excessive scraping can damage polyester fibers.
In many cases, replacing the panel is more practical than attempting to completely restore a heavily contaminated backing.
How to Replace a Damaged PET Acoustic Panel
Replacing one panel is relatively straightforward when the original installation was properly planned.
Step 1: Confirm the Panel Specification
Before ordering a replacement, verify:
- Panel dimensions
- Thickness
- Color
- Surface pattern
- Edge configuration
- Installation method
For long-term projects, it is especially important to confirm the color batch.
PET materials can have slight batch-to-batch color variation, so a replacement panel produced years later may not be visually identical to the original.
Step 2: Remove the Damaged Panel
Follow the appropriate removal procedure based on whether the panel uses screws, adhesive, or a mounting system.
Avoid damaging adjacent panels during removal.
Step 3: Prepare the Wall
Before installing the replacement:
- Remove loose adhesive
- Repair damaged areas
- Clean dust and debris
- Check that the surface is flat
A properly prepared substrate helps prevent the replacement panel from sitting unevenly.
Step 4: Install the New Panel
Use the same fixing method where practical.
For commercial installations, mechanical fixing can make future replacement considerably easier.
How to Avoid Damage During Panel Removal
Several simple precautions can significantly reduce the risk of damage.
Don’t Pull Too Quickly
Sudden force can tear the PET structure or damage the panel corners.
Don’t Bend the Panel Excessively
Although polyester fiber panels are relatively flexible, severe bending can permanently deform the material.
Protect Adjacent Panels
When removing a single panel from a larger installation, protect neighboring panels from:
- Pry tools
- Drills
- Cutting tools
- Falling debris
Label Removed Panels
For large projects, mark each removed panel according to its original location.
This can be useful when panels are temporarily removed during electrical, furniture, or renovation work.
What Installation Method Is Best for Future Replacement?
If you expect the panels to be removed or replaced in the future, the installation method should be considered during the initial project design.
Mechanical Fixing
Best for removability.
Screws and mechanical fasteners allow panels to be removed with relatively little damage.
Adhesive
Best for a clean, seamless appearance.
However, adhesive-mounted panels can be significantly more difficult to remove without damaging the panel or substrate.
Hybrid Installation
For some commercial applications, combining adhesive with mechanical fixing can provide additional stability while retaining some serviceability.
The appropriate method depends on the panel specification, wall structure, and project requirements.
What About PET Acoustic Desk Screens?
The same principle applies to PET acoustic desk screens and workstation partitions.
Because office furniture layouts frequently change, removable fixing systems can provide significant advantages.
For example, a business may need to:
- Reconfigure workstations
- Move desk screens
- Replace damaged partitions
- Add additional acoustic panels
A modular installation system can make these changes considerably easier.
Color Matching When Replacing PET Acoustic Panels
For long-term distributors and commercial projects, replacement color matching deserves special attention.
A polyester fiber acoustic panel is colored throughout the fiber structure rather than simply being painted on the surface. Even when the same color specification is ordered, small differences between production batches can occur.
Professional manufacturers can reduce this variation through:
- Consistent raw material sourcing
- Fixed color formulations
- Controlled masterbatch
- Standardized production parameters
- Instrument-based color inspection
For large distribution programs, it is also useful to keep records of the original color code and production batch.
How Leedings Acoustic Supports Replacement Projects
As an experienced acoustic panels supplier in China, Leedings Acoustic provides PET acoustic panels for distributors, contractors, furniture manufacturers, architects, and commercial projects.
We can support projects with:
- Standard and custom panel sizes
- Multiple thickness options
- Various colors
- CNC-cut panels
- OEM and ODM production
- Technical installation guidance
For long-term projects, maintaining accurate product specifications and color information helps simplify future replacement orders.
Frequently Asked Questions
Can PET acoustic panels be removed and reused?
Yes, particularly when they are mechanically fixed. Adhesive-mounted panels may also be reusable, but removal can damage the panel depending on the adhesive and removal technique.
Can PET acoustic panels be installed without permanent adhesive?
Yes. Mechanical fasteners and suitable mounting systems can be used depending on the wall structure and project requirements.
Is it better to replace one damaged panel or the entire wall?
Usually, a single damaged panel can be replaced when the installation is modular. However, large projects should consider potential color variation between production batches.
How can I make future replacement easier?
Consider using mechanical fixing or a removable mounting system during the initial installation, and keep records of the panel’s color, thickness, dimensions, and production batch.
Conclusion
Removing and replacing PET acoustic panels does not have to result in damaged panels or expensive wall repairs. The key is to understand the original installation method and remove the panels gradually rather than relying on excessive force.
For the easiest future maintenance:
- Use mechanical fixing where removability is important.
- Protect adjacent panels during removal.
- Store reusable panels flat and dry.
- Record product specifications and color information.
- Consider potential batch-to-batch color differences when ordering replacements.
With proper installation and maintenance planning, polyester fiber acoustic panels can remain a flexible and serviceable acoustic solution throughout the life of an interior space.
Leedings Acoustic provides professional PET acoustic panels and customized acoustic solutions for global distributors, furniture manufacturers, contractors, and commercial projects.