
Akupanels are designed for fast installation while delivering both architectural aesthetics and acoustic performance. Depending on wall type, project requirements, and future flexibility, Akupanels can be installed using adhesive, screws, or a combination of both.
This guide explains the differences between adhesive and screw installation, when to use each method, and how to achieve the best results.
Installation Method 1: Installing Akupanels with Adhesive
When Adhesive Installation Works Best
Smooth drywall or plaster walls
Residential or decorative spaces
Projects requiring a clean, screw-free appearance
Lightweight Akupanel formats
Recommended Adhesive Types
MS polymer construction adhesive
High-strength PU adhesive
Acoustic panel–approved mounting glue
(Always avoid water-based glue for heavy panels.)
Pros of Adhesive Installation
No visible fixings
Faster installation
Minimal wall damage
Cons of Adhesive Installation
Difficult to remove panels later
Not ideal for uneven, concrete, or brick walls
Limited load-bearing strength
Installation Method 2: Installing Akupanels with Screws
When Screw Installation Is Recommended
Concrete, brick, or uneven walls
Commercial and high-traffic environments
Large or heavy Akupanels
Projects requiring removability
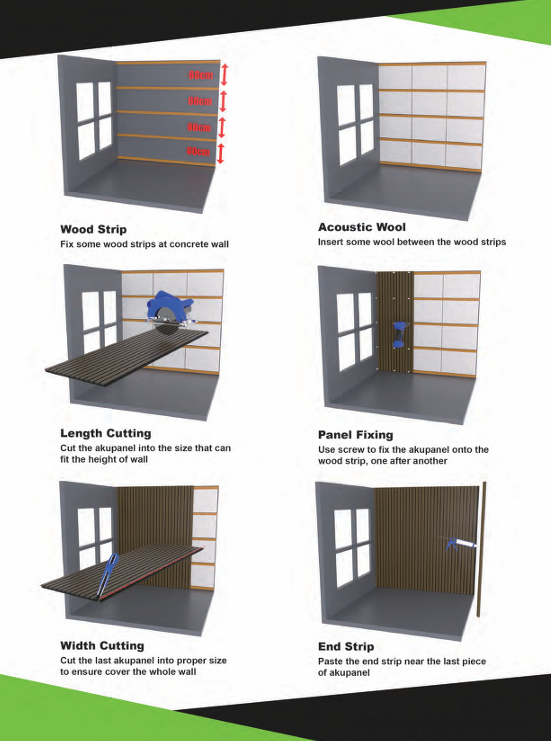
Step-by-Step Screw Installation
Mark Fixing Points
Mark screw positions through the PET felt backing
Typically between slats for hidden fixing
Drill and Plug
Drill holes according to wall type
Use wall plugs for masonry surfaces
Fix Panels
Secure panels with black or matching screws
Avoid overtightening to protect the felt
Check Alignment
Recheck level after securing each panel
Pros of Screw Installation
Strong and secure fixing
Suitable for all wall types
Panels can be removed or adjusted
Cons of Screw Installation
Slightly longer installation time
Minimal visible fixings if not positioned carefully
The Best Practice: Adhesive + Screws Combined
For optimal strength and stability, many professionals use a hybrid method:
Apply adhesive for vibration control and acoustic sealing
Add screws for mechanical security
This method is especially recommended for:
Large-format Akupanels
Public or commercial interiors
Ceiling-height installations
Adhesive vs Screws: Quick Comparison
| Feature | Adhesive | Screws |
|---|---|---|
| Installation speed | Fast | Moderate |
| Visual finish | Seamless | Nearly invisible |
| Wall compatibility | Smooth walls only | All wall types |
| Removability | Difficult | Easy |
| Long-term security | Medium | High |
Installation Tips from Leedings Acoustic
Always start with a perfectly level first panel
Allow panels to acclimate to room temperature before installation
Consider adding an air gap behind panels to improve acoustic performance
Choose fixing methods based on wall condition—not just appearance

Final Thoughts
Both adhesive and screw installation methods can deliver excellent results when applied correctly. The best choice depends on your wall type, panel size, and future flexibility needs.
Leedings Akupanels are engineered for easy installation across residential and commercial spaces. With the right fixing method, you’ll achieve a durable, high-performance acoustic wall with timeless style.